How to Install Bahama Shutters
Two pieces of hardware are needed to install Bahama shutters to a window. A suspension hinge at the top and extension support arms at the bottom work in tandem to give proper support and angle to the Bahama-style shutter. The key to a successful installation begins in the measurement phase of the project. When the measuring for Bahama shutters stage is skipped, there is no plan to accomplish the installation.
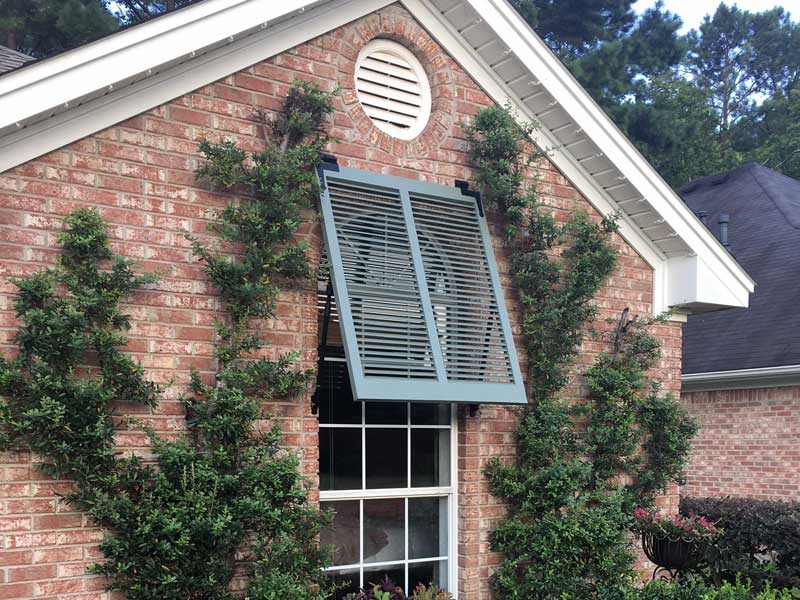
The top-mounted hinge creates a fulcrum for the shutter to pivot and extend away from the window at the bottom. Support arms (also called stays) cantilever between the window and shutter to stabilize the panel in a stationary open position. Adjustable support arms have tension screws to locate the best angle. They release to fully close the Bahama shutter in a down position for privacy, security, or storm protection.
Tropical Bahama shutters are relatively easy to install with an organized sequence of steps. Installation of Bahama shutters will vary from one window to the next making it necessary to modify and adapt the process for each, and is very different from the installation of standard exterior wood shutters.
Bahama Shutter Hinges
A small assortment of Bahama shutter hinges are common for installation. Homeowners have devised a number of unique and impressive homemade techniques to hang Bahama shutters, yet we advise using the most traditional method.
The aluminum sliding Bahama track hinge suspends the Bermuda shutter in front of the window trim. It is constructed in two pieces: one that secures to the top of the window and one that screws to the top face of the exterior Bahama shutter. This hinge type is available when purchasing ShutterLand Bahama shutters. Select from a standard hinge, build-out hinge, or flat-top hinge.

There are multiple advantages of installing Bahama shutters with a top sliding hinge. This particular installation method can be accomplished on deep or shallow window openings and fully supports the shutter. The horizontal ledge of the extended hinge protects the top of the shutter from heavy rain and makes the hinge easy to level while installing. The hinge mobility allows the exterior shutter to lift up to an angle of 70 degrees away from the window. Hinges from ShutterLand arrives in a natural silver, but may be painted black or the same color as the window shutter if desired. They can be used for either wood Bahama shutters or PVC Bahama shutters.
The installation of aluminum Bahama hurricane shutters is similar but requires a different measuring technique. Follow the instructions to measure for aluminum Bahama shutters for more details.
Multi-hinge (see picture above) systems operate when mounted in alignment with the two outside stiles of a Bahama shutter. Some hinges are designed to nest Bahama shutters inside of a deep opening, while others provide enough clearance for the window shutter to mount proud of the opening. Each hinge consists of two components that interlock with a central pintle. The heavy cast iron or stainless steel construction will contribute desirable visual accents and reliable service. This type of hinge will need to be purchased from an outside shutter hardware supplier.
Bermuda Hinge Alternatives
Homeowners occasionally craft DIY supports to hold outdoor Bahama shutters in position. They sometimes consist of wedge-shaped wooden blocks or bent metal brackets. This may be the cheapest method to install Bahama shutters, but also may result in diminished functionality.
Bahama Shutter Support Arm Options
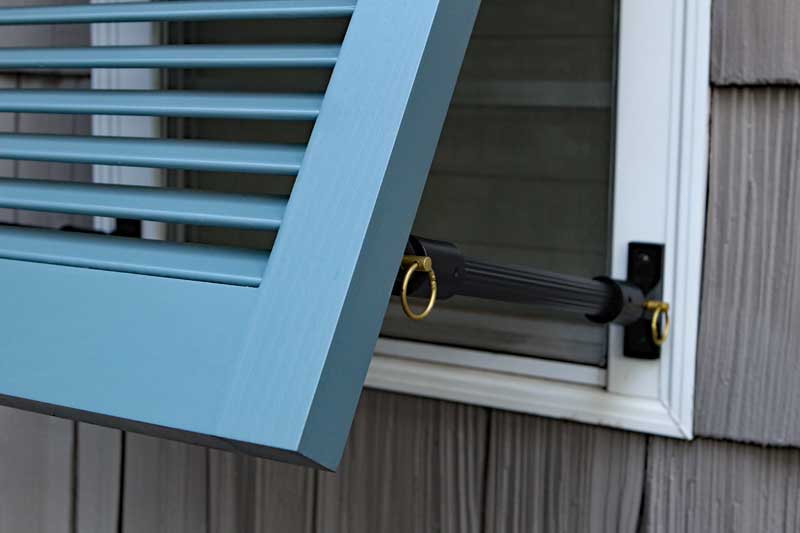
A “shutter stay”, or support arm, produces division between the lower part of a Bahama shutter and the window. A number of options exist to perform this task. The most popular employs a telescoping aluminum arm with brackets on either end. Fixed length supports can be trimmed to achieve the desirable length. ShutterLand offers adjustable support arms with a purchase of Bahama shutters. Removing the central pole permits the brackets to lock together in a closed position for moderate storm protection.
A custom DIY Bahama shutter arm can be fabricated from a number of materials. Some homeowners craft wood stays in decorative shapes that enhance the character of the home.
Bahama Shutter Open Angle
The best Bahama shutter angle is subjective. The louvers of ShutterLand wood Bermuda shutters are fixed at 30 degrees and PVC shutters at 25 degrees. For maximum visibility, the shutter angle should elevate the louvers as close to parallel as possible. It may be beneficial to drop that angle just slightly so water is ushered away from the window and does not rest on a horizontal louver. For street-level shutters, the angle may cause them to project too far into livable space, and it may be advantageous to drop the mounting angle even more. The sight line from inside the home is reduced the further the angle deviates from the ideal. Installing Bahama shutters that raise the louvers beyond 90° is generally undesirable.
The installation angle of Bahama shutters hinged to multiple windows should remain consistent for all panels installed. Taller Bermuda shutters will need longer mounting arms to keep the angle identical.
Bahama Shutters Installation Instructions (Abbreviated)
Time needed: 1 hour
Use the tips below in conjunction with the video for complete guide
- Separate the top track hinge from bottom
- Trim top hinge if necessary to shutter width with a hacksaw
If the hinge arrives long, cut to the same width as the shutter.
- File cut edge
- Paint installation screw heads
Use stainless steel or other non-corrosive metal. Header screws need to be long enough to grip solid material. Shutter side screws need to be short enough not to exceed the 1.5″ shutter depth. If attaching the hinge to brick, block, stone or concrete, employ tapcon screws.
- Drill screw holes in header bracket
Locate 1.5″ from either end and equally space no more than 8″ apart.
- Align bracket with top of the window
- Level & pre-drill holes slightly smaller than the screws
- Secure screws in all of the holes
- Cut the lower hinge leaf with a hacksaw
Size to the width of the shutter panel or, if you will later crimp the top channel to prevent the hinge from sliding, trim slightly shorter than the shutter width.
- File and paint the edge
- Center and screw to the top front face of the shutter
Make sure the shutter is right side up and the louvers are pointed in a downward direction.
- Slide the shutter side hinge into the header channel
If the shutter is excessively wide or there is not space to the side of the window, remove the top hinge leaf from the window. Connect the two portions of the hinge. Then, lift the shutter and reattach the header screws to the house.
- Remove the linchpin on either end of the shutter stay
- Connect the end brackets with a pin
- Hold between the window and shutter
One bracket should rest on the back of the shutter side stile about 3 inches from the bottom. The other should push against a flat surface of the window trim or house siding.
- Mark the horizontal position of the shutter-side bracket
- Release the linchpin, align the shutter-side bracket, predrill
The shutter may need to be removed for this operation. It is common for the bottom of the bracket to align with the top of the bottom rail. However, it may be necessary for an alternate location. Do not drill deeper than 1″ for a 1.5″ thick panel.
- Anchor the bracket with screws
- Reconnect the brackets
Note the position of the window-side bracket
- Predrill and screw the window-side bracket in place
- Hold the shutter at the final resting angle
- Measure the throw
The distance from one base bracket to the other
- Remove the shutter stay end caps
Release the tension screws and remove both caps
- Cut the central aluminum arm
Subtract 4.25″ from the desired throw and saw to that length
- Reconnect end caps
- Reconnect the support arm
- Repeat
Install the second shutter stay on the opposite side
- Pinch the ends of the top hinge channel
Use pliers to crimp the opening to prevent the shutter from sliding from side to side
Bahama Shutter Installation Tools
- Ladder
- Staging Table
- Hack Saw
- File
- Black Spray Paint
- Tape Measure
- Drill
- Drill Bits
- Phillips Driver Bit
- Level
- Pencil or Awl
- Pliers